Tag Archives: recycle

Do: The big blog clothes swap

fashion grid

Last month we took part in the Big Blog Clothes Swap, an exciting experiment organised by Janet from Words That Can Only Be Your Own and Stephanie from The Wardrobe Angel.

The idea was simple – send in your measurements, get twinned with another similarly proportioned blogger, send off a parcel clothes you no longer wear, get your own exciting package in the post!

E was partnered with Elise and B with Stephanie – both stylish ladies, so we felt a little pressured!

This kind of project is completely up our street, but we found there were some other surprising outcomes from taking part…

  1. It made us realise how particular clothes hold special memories – and were difficult to part with
  2. We rediscovered clothes we hadn’t worn for ages – but actually still like and fit well
  3. Having looked through our piles of clothes ready for the charity shops, we ended up holding our own clothes swap – E now has B’s jeans and B has E’s skirt!
  4. We were challenged to try new styles and questioned whether we’d got stuck in a style rut
  5. Despite the ‘fresh’ Spring weather, we actually quite enjoyed doing some outfit posts – and might look to do more in the future…
  6. … but maybe next time we’ll actually iron the clothes/put make-up on!

So here’s a selection of some of our outfits – a combination of swaps…

b outfit 1.1b outfit 1

B Wears: Dress – H&M via Stephanie’s wardrobe, bag – vintage

e outfit 1 E outfit 1 1

E Wears: Knitwear- H & M Shirt – Asos both via Elise’s wardrobe, jeans- Topshop via B’s wardrobe

b outfit 2

b outfit 2

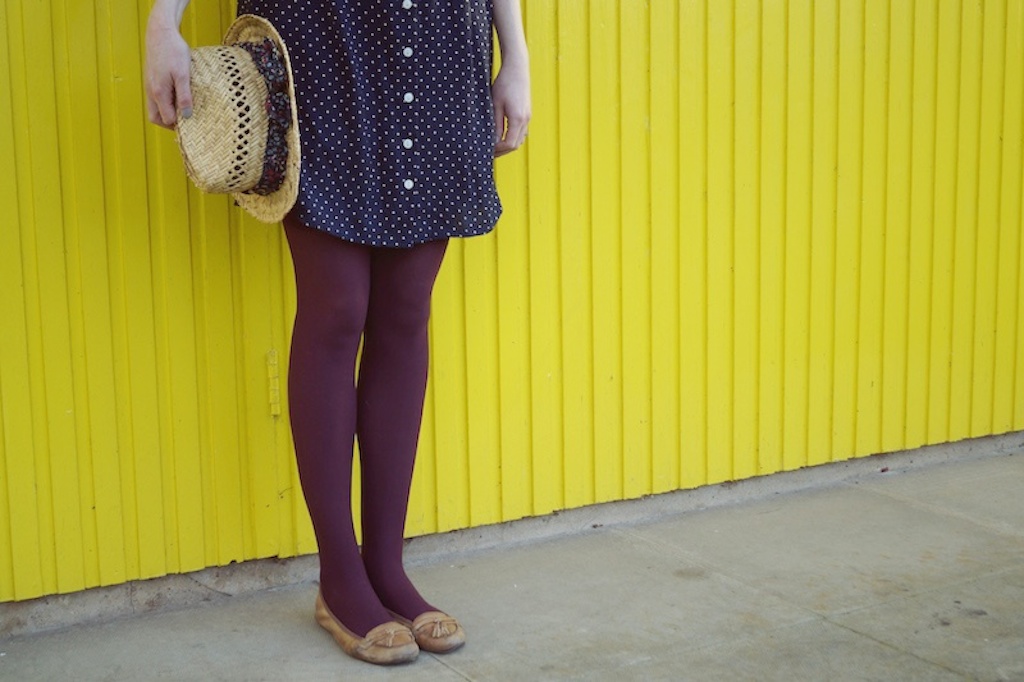
B wears: Skirt – Primark via E’s wardrobe, necklace – via Stephanie’s wardrobe, top and hat – H&M, watch – Uniform Wares

e outfit 2 e outfit 2

E wears: Dress- Dorothy Perkins via Elise’s wardrobe

BB

B wears: Knitwear – Dorothy Perkins via E’s wardrobe, dress – charity shop find

e outfit 3e outfit 3

E wears: Dress Marks and Spencers, via Elise’s wardrobe

Did you take part in the swap? We’d love to see the results…

Tagged , , , , ,

Do: Get organised

sharpen pencils

It’s been a little quiet of late on the make do and spend front, January has found me penniless and wanting to curl up in a ball and hibernate. I’ve busied myself with the indoor activity of getting organised and in so doing have performed something of a minor miracle.

I cleaned out my room of mess.

I first wrote of the room of mess in February 2013 where I talked of my plans to attack the mess. It has remained in a constant state of mess ever since, in fact the chaos has accumulated since I moved into my little house nearly 5 years ago……that is until now.

So, here’s a little peek at how it has existed for the last 4 and a half years, painful and shameful viewing I’m sure you will agree

before

As you can see, this was no small undertaking. I attacked it over a few painful weeks with small flurries of cleansing, tidying, determination, disgust and self loathing followed by a massive sense of accomplishment as the job got closer to completion

after

…….And here is how it looks today! Hooray for organisation!

So, now we re-name this room E’s study and I can get on with the fun task of making the room pretty and of course, blog worthy

Let’s take a moment to remember William Morris’ wise words “Have nothing in your house that you don’t know to be useful or believe to be beautiful.”

I’m sure he did not have a magpie like myself in mind when he wrote this

finishing touches 

This morning I indulged in the smile pleasure of sharpening all the pencil crayons I had unearthed during the cleanse. A completely rock and roll way to spend a sunday morning I tell you! Then I set about creating little homes for the pencils to live in by upcycling some old tin cans that were lurking in the kitchen (once a hoarder, always a hoarder) out came the masking tape (Of which, post cleanse I find I have six rolls) and paint tester pots (Best not to ask how many of these were discovered)

recycle tin cans

Before….

paint tin cans

……during……..

organisation

……….after

new home for pencils

So now all my pens, pencils and paintbrushes have new homes and the world is a better place

Roll on payday and get me back too the pub!


Tagged , , , , , , , , ,

Make: A scrapbook

you will need...

I’m off on a trip to Rye in East Sussex this week, I wanted to take a scrapbook to record memories along the way. Instead of buying a brand new sketch book I decided to recycle some old magazines, wallpaper samples and map books and create my own unique book, complete with a map of the area we are going to visit.

I find brand new sketchbooks intimidating, it’s hard to know where to start and I can never use the first page! Hopefully with a homemade book starting will be a little easier.

Heres what you will need:

  • Old magazines, wallpaper samples and any other interesting textured paper you can find around and about, different surfaces will add interest to your final book
  • Scissors
  • A needle and thread – I used embroidery thread

begin by making 4 little books-to be sewn all together

Begin by taking a selection of papers and fold them in half to create a small book, use no more than six sheets per book and be mindful that any images will be folded in half. These little books will then be sewn together to make a larger book. I made 4 little books in total. Don’t worry too much about being to neat and tidy, ripped edges and differently sized pages will add extra interest to the final book.

pierce holes in the spine of eack little book

Pierce through the spines of the books with the needle, about 5-7 holes. Do this for each little book, the aim is to get all the holes evenly in the same place for each book to create a nice neat and even spine in the finished book.

begin inside the book and sew outsew through the seams of each little book

Next take two of the little books and place side by side. Take the needle and thread, using the pre-made holes sew up inside the first book and down into the second book. Repeat this all the way down the spine of the book so you have a larger book. Pull the thread as tight as you can to add structure to the book. Repeat this process with the next two books, then sandwich these two larger books together and sew the middle two books together along the spine.diagram for bookbinding technique This diagram shows he path your needle should followthe spine of the book 

Finally, knot the thread at the end and sit back and admire your homemade book . The finished book should be quite sturdy, you can apply washi tape to the outside of the spine to protect it or leave as is so the stitching is exposed.

different textures and surfaces will add interest to your book

How do you record memories?

Tagged , , , , , , ,

Make: Jam Jar Planters

you will need….

I’ve confessed to being a hoarder here  before, jam jars seem to be my weakness. I cannot throw them away, I cannot refuse them if they are offered to me and they are all but taking over the house. So last week I was offered a glut of jam jars which I accepted without hesitation. The same day I was chatting with my friend H about how she was growing spring bulbs in some old baking tins. H later sent me a picture of the bulbs and a message saying “i’m feeling a bit Narnia, Spring is coming” and I got all inspired to create my own Narnia at home with said jam jars and a little emulsion paint (yes, I collect paint too)

Here’s what you will need:

  • Jam jars, of varying sizes
  • Emulsion paint, this is a good way to use up leftover paint from recently decorated rooms
  • A paint brush
  • spring bulbs, I used daffodils and violas, (please note: I tried hyacinths, these do not fit into jam jars)
  • Compost soil

paint the inside of the jarsBegin by painting the inside of the jam jars, they may take a couple of coats, over a couple of days to ensure threw are no patches. Leave the jam jars in a warm place to dryleave to dry in a warm placeOnce the jars are completely dry plant the bulbs in the jam jars with plenty of moist compost and place them on the windowsill or mantlepiece.plantingbefore….…..afterdoneFinally, stand back and admire Narnia. It may be wet and windy outside but inside is now bright and full of the joys of spring!

How are you brightening up winter days?

Tagged , , , , , , , ,

Make: Chilli, garlic and herb infused olive oil

The next addition to my Christmas gift hampers will be chilli, smoked garlic and herb infused olive oil.

Olive oil carries flavours fantastically and this is a brilliant way to capture fresh flavours in a bottle. It’s also a tasty way to to recycle old wine bottles and use up any herbs that are waiting to be harvested before the frost comes. It’s fairly swift to make too, you just need to be a little patient whilst waiting for the oil to infuse.

I’ve used pomace olive oil here, which is a little less expensive than virgin olive oil but still very tasty. Virgin olive oil is cold pressed whereas pomace oil is hot pressed, its just a slightly lower grade of olive oil. I picked up this 5 litre drum from my local supermarket.

For this batch of infused olive oil i’ve used the following:

  • 6 empty wine bottles, i’ve used little ones here too. 4 small bottles are equivelant to 1 large bottle
  • 5 litres pomace olive oil
  • fresh whole chillis washed- i’ve allowed for one or two per bottle
  • fresh herbs washed- i’ve used sage and rosemary
  • 1 bulb of smoked garlic
  • a handful of juniper berries
  • a handful of pink and black peppercorns
  • a funnel to help decant the oil into bottles

The possibilities are endless, you could use all or just one of the above ingredients. Other delicious variations are Cinnamon, lemongrass, curry leaves, cumin, fennel, caraway, citrus, etc, etc, etc!

Step one- steralise your bottles this can be done with some hot soapy water, rince well to make sure no soap bubbles remain, then leave the bottles upturned to dry.

step two- Evenly distribute the herbs, chillis, garlic and peppercorns amongst the wine bottles. I’ve used assorted sizes of bottles, so i’ve used two cloves of garlic and two chillis in the larger bottles and one chilli and garlic clove in the smaller bottles.

step three- gently warm your olive oil on the stove to about 75 degrees- do not boil it as it will be too hot to handle. Place a funnel in the top of a wine bottle and carefully pour in the warm olive oil.

The oil should be ready to use in 3-4 weeks time. It’s great to use for salad dressing, can be used in stir frys to enhance flavour or paired with a good balsamic vinegar this is perfect for dipping  foccacia into!

The oil lasts for up to three months, or until the herbs begin to loose their colour. The oil does not preserve the herbs, garlic and chilli, only their flavour. To make the oil last longer the herbs, garlic and chilli can be strained out, and the oil re-bottled.

Tagged , , , , , , , , , , , , , , , , , , ,